




 Request Quote



Aluminum Recycling Line Maintenance Checklist
A field-oriented checklist for the parts that usually determine whether the aluminum scrap line continues to run:conveyors,shrinkling equipment,screens,magnets,eddy current separators,hydraulic systems,control and product flow themselves.
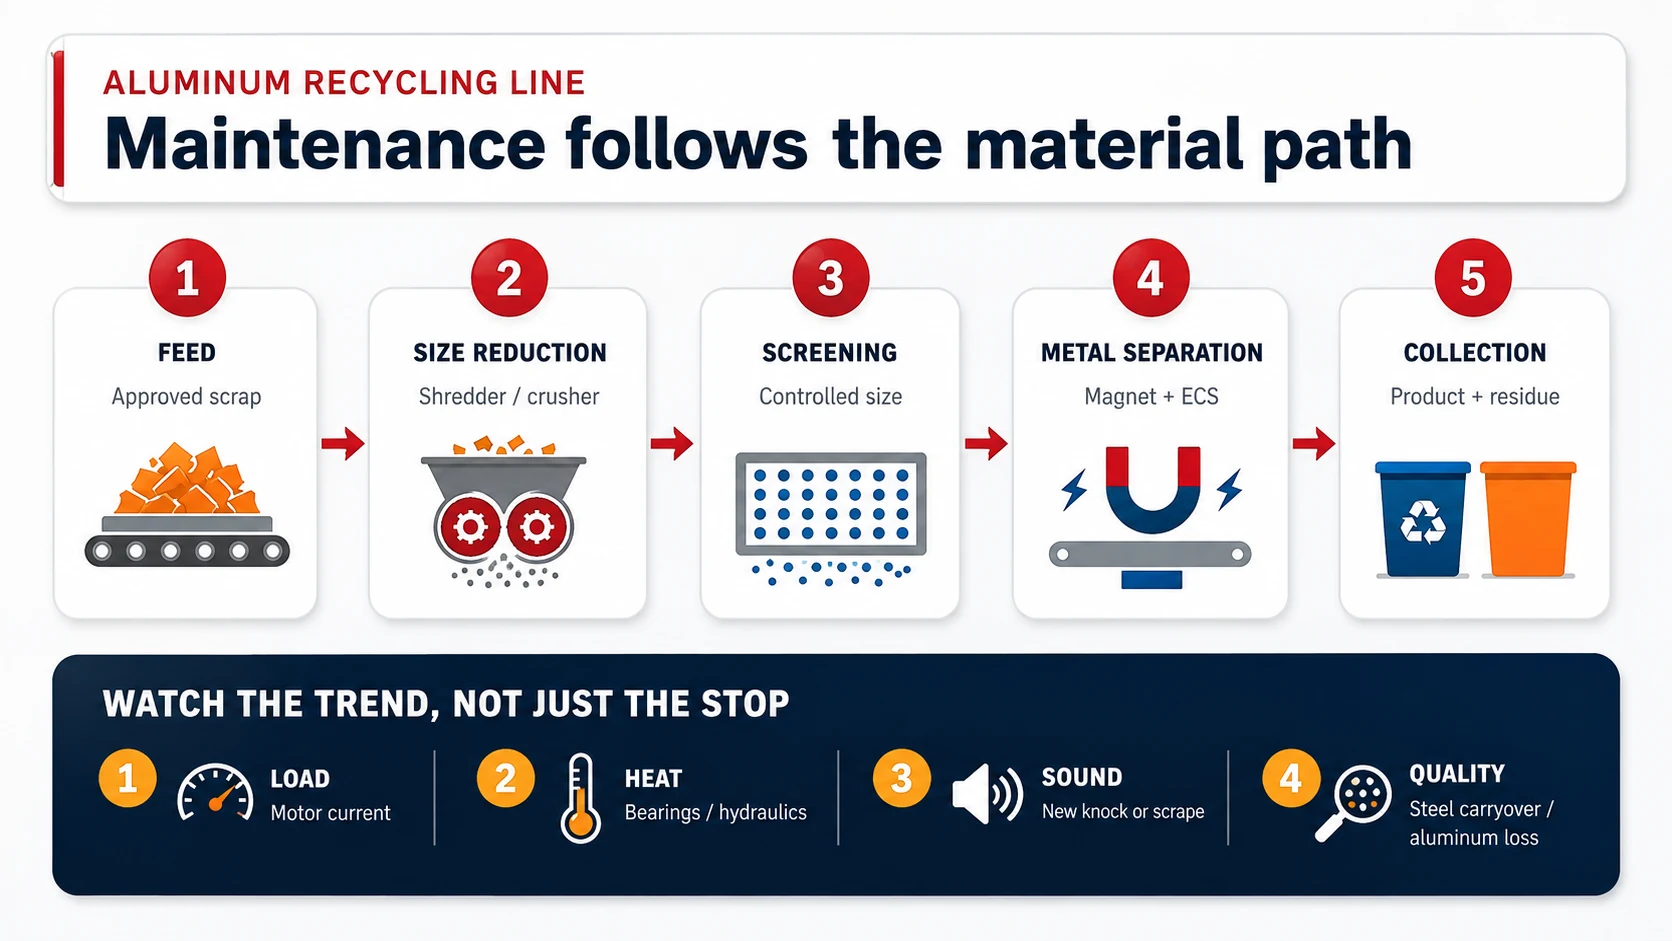
One “Aluminum Line” Can Contain Three Different Maintenance Systems
“Aluminum recycling line” is a convenient label, but it can describe very different work. YUXI’s scrap aluminum recycling line is arranged around the incoming scrap and the product the plant needs to sell or remelt. Mixed profiles may need shredding, screening, magnetic removal and eddy current separation. Light, already sorted scrap may go to a baler. Chips and turnings bring another set of problems: liquid, bridging and compaction.
Those routes do not wear in the same way. A hammer mill reacts to impact and rotor balance. A low-speed shredder is more sensitive to cutter condition, wrapping and hard inclusions. A briquetting press lives with hydraulic cycles, chamber wear and fluid control. Feed quality changes the interval as much as the machine name does. EPA guidance makes the same broader point: secondary-aluminum pretreatment is assembled from sorting and mechanical preparation stages chosen for the scrap being handled, not from one universal flowsheet.[6]
| Process route | Main maintenance pressure | What usually changes the interval |
|---|---|---|
| Shredding and sorting | Cutter or hammer wear, bearing condition, belt tracking, buildup, screen condition, magnet carryover and ECS protection | Feed thickness, hard inclusions, attached steel, abrasiveness, wrapping material, throughput and required particle size |
| UBC or light-scrap baling | Hydraulic leaks, ram and chamber wear, wire or tie system, sensors, door interlocks and contamination around the press | Residual liquid, bale density, loose steel, dirt, feed consistency and cycle count |
| Chip and turning briquetting | Fluid control, feeder bridging, compaction chamber wear, hydraulic pressure, seals and product density | Moisture, cutting fluid, fines, alloy mix, long turnings and daily cycle count |
Safety Comes Before Inspection, Cleaning or Unjamming
The seemingly insignificant work is usually the one that brings people the closest to the moving part:pulling out a strap from the belt,cleaning the chute,wiping the sensor or checking the reason why the cutter stopped.Once the guard opens or enters the material path with one hand,ordinary production stops are no longer enough.
For general-industry sites in the United States, OSHA 29 CFR 1910.147 applies when repair or maintenance may expose workers to accidental start-up or released energy.Inspection,lubrication,cleaning and card resolution are all within the scope.[1] OSHA’s machine-guarding rules solve the hazards of operating points,bite points,rotating parts,flying chips and sparks respectively.[2]
The disconnect on the largest motor is only one part of the energy picture. A line may also hold hydraulic pressure, rotor inertia, raised components, compressed scrap and material that can move by gravity. Connected conveyors matter too. The site procedure has to deal with the whole work zone, not just the machine that first drew attention.
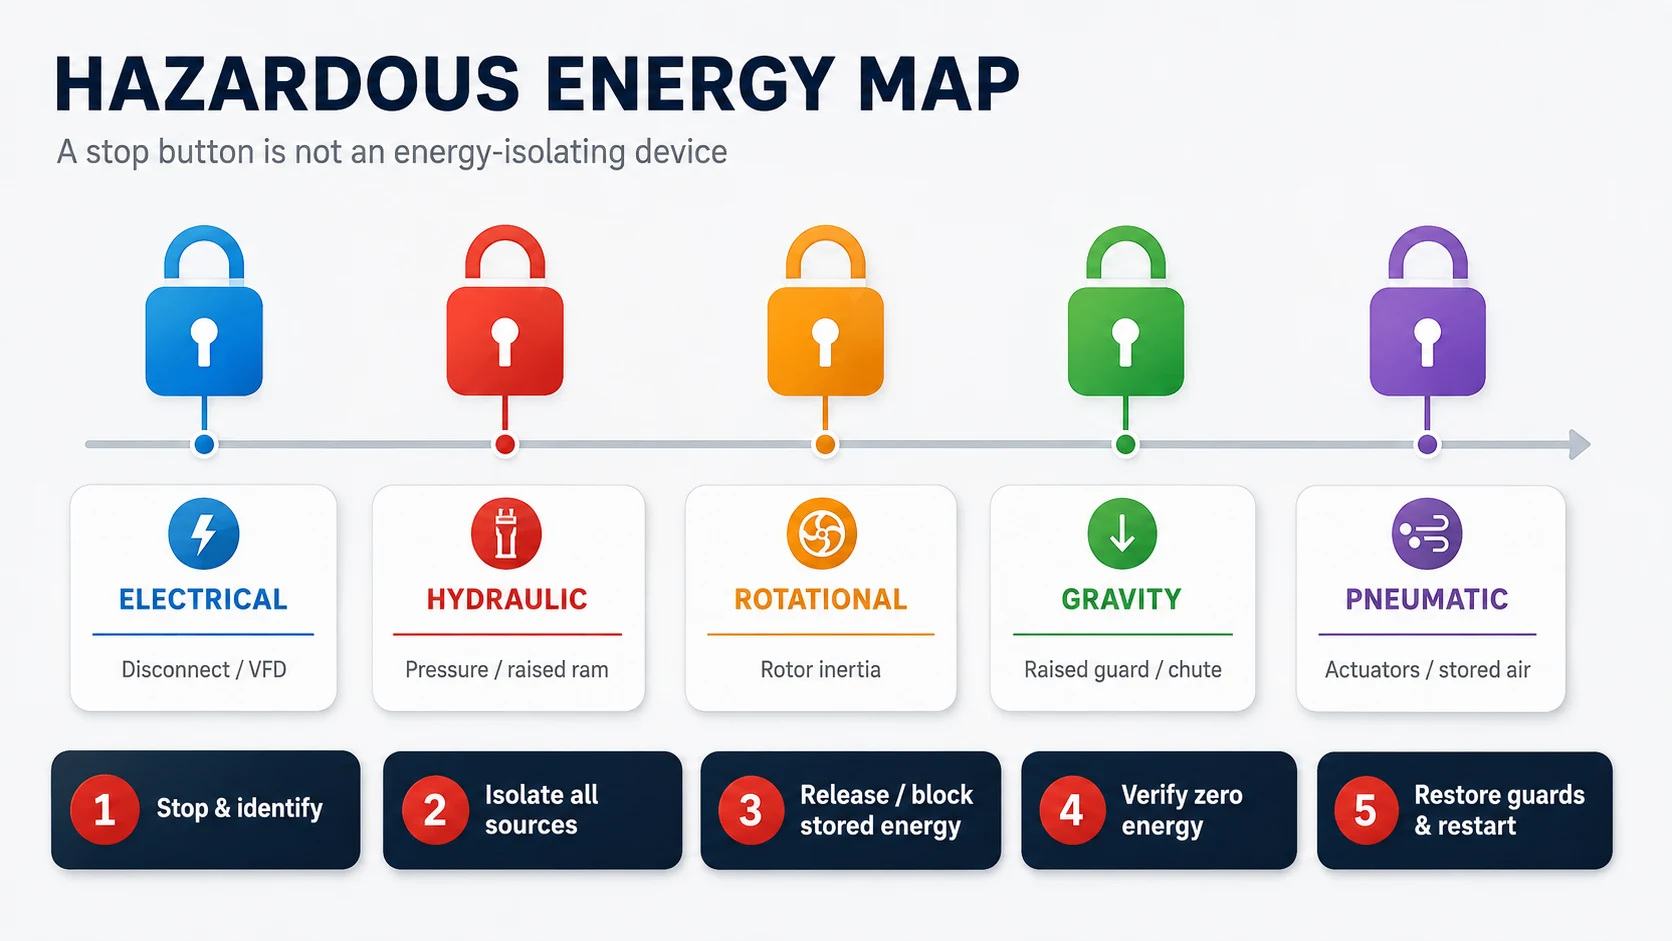
Minimum isolation logic
- Stop feeding and use the normal shutdown sequence so only the sections permitted by the procedure can clear.
- Identify every electrical, hydraulic, pneumatic, mechanical and gravitational source that can affect the work area, including connected conveyors.
- Have authorized employees apply the site’s written lockout/tagout procedure.
- Release, block or restrain stored energy. Rotor coast-down, suspended parts and trapped hydraulic pressure are easy to overlook.
- Verify the zero-energy condition with the approved test method before anyone reaches into the equipment.
- When the work is finished, account for people and tools, restore guards, notify affected employees and restart under control.
OSHA’s scrap-metal recycling guidance includes a fatal conveyor-entanglement case and points to guarding, reachable emergency stops and lockout/tagout during cleaning, servicing and maintenance as preventive measures.[3] In other words, “we pressed stop” should never be the final isolation instruction.
Maintenance Frequency Overview
A workable schedule has more than one clock. Operators notice visible changes from shift to shift. Maintenance technicians take measurements and make adjustments. Planned stops provide the access needed for internal wear parts, electrical work and alignment checks. Major service should follow hours, condition and component limits—not the fact that another month has passed.
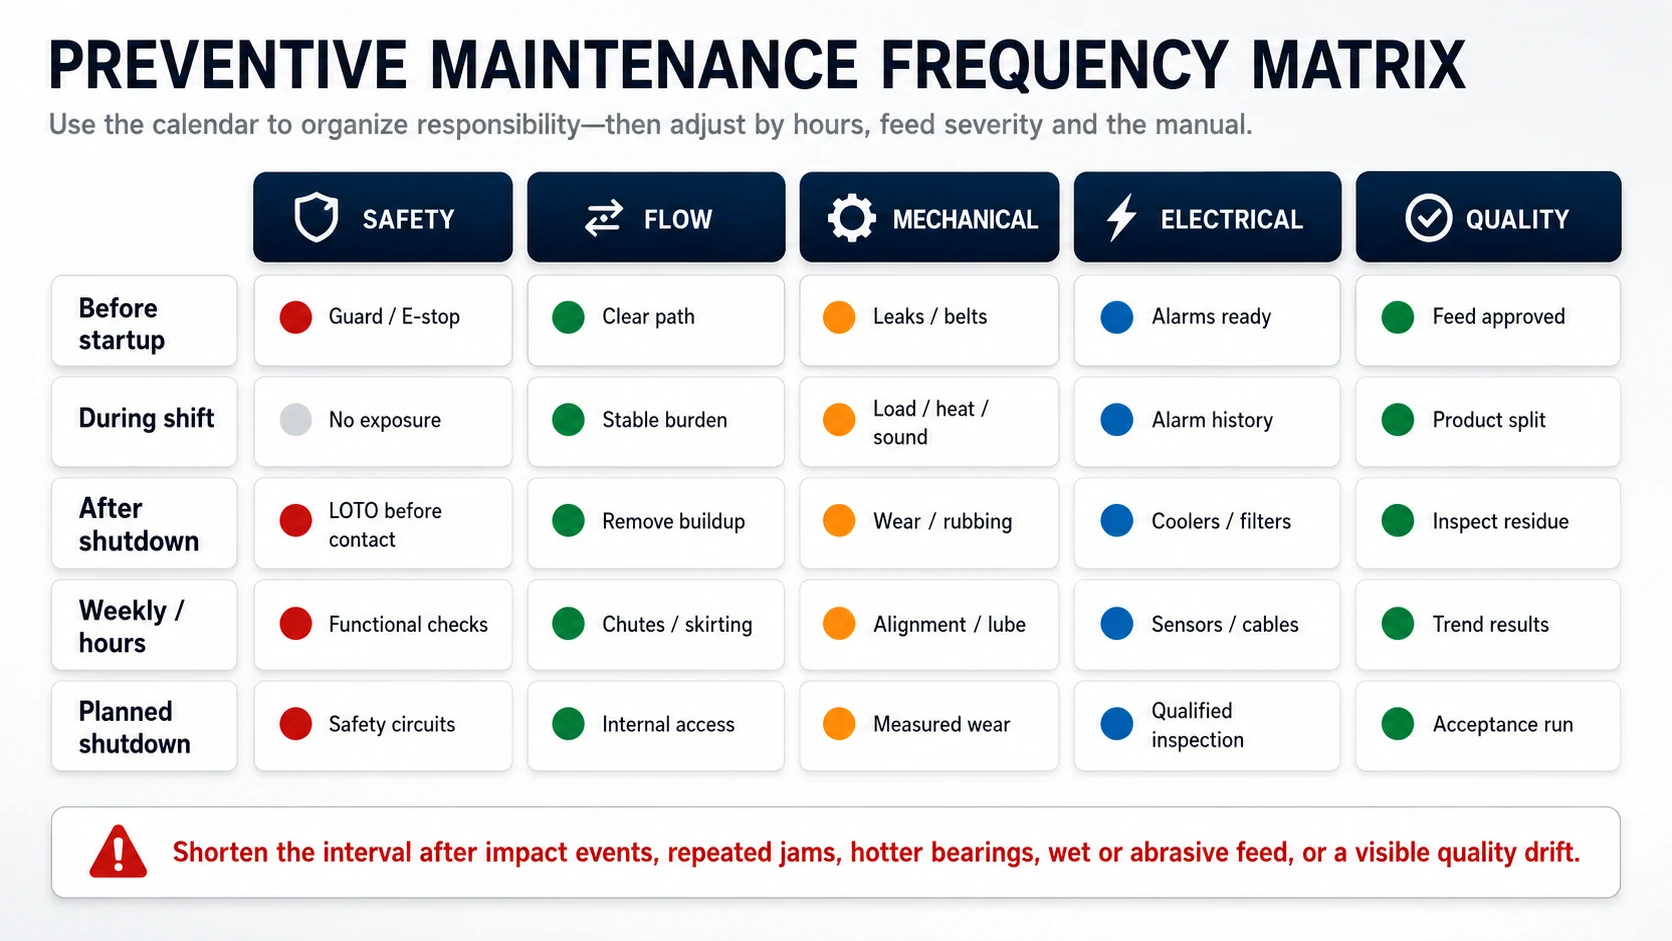
| Frequency layer | Typical scope | Escalate or shorten the interval when… |
|---|---|---|
| Before startup | Guards, interlocks, emergency stops, leaks, loose parts, belt path, clear chutes, feed exclusions | The previous shift reported a jam, impact, abnormal stop or unfinished repair |
| During every shift | Sound, temperature, vibration, motor load, reversals, feed behavior, output and reject quality | Any trend departs from the established baseline |
| After shutdown | Approved cleaning, buildup removal, visible wear, leaks and housekeeping | Fine, oily, wet or wrapping material accumulates quickly |
| Weekly or by operating hours | Fasteners, tension, alignment, lubrication points, seals, sensors, cables, chutes and skirting | The line runs multiple shifts or sees abrasive and contaminated feed |
| Planned shutdown | Internal wear measurement, bearing checks, structural inspection, electrical inspection and calibration | Wear reaches an action limit, production becomes unstable or an impact event occurs |
The labels below are a way to divide responsibility. They are not service intervals for a particular YUXI model. Some items need attention every day; others may be sealed or checked only after a stated number of hours. The final machine manual remains the controlling document.
Pre-Start and Every-Shift Checklist
A pre-start inspection should be brief enough to happen every shift and specific enough to prevent a bad start. “Walked around—OK” tells the next person almost nothing. The operator needs to know which finding stops the line, which one can be watched and which one becomes a work order.
Before the line starts
- Read the previous shift log first. Confirm that repairs are closed and that no lock, tag, tool or temporary arrangement remains in the line.
- Look at guards, access doors, interlocks and emergency-stop devices before the approved functional check. A displaced guard is not a housekeeping issue.
- Clear walkways and maintenance access. Loose scrap, oil, cutting fluid and water make a routine inspection harder and a later emergency response slower.
- Treat a fresh oil or grease mark as evidence. Find its source before it is wiped away and forgotten.
- Inspect belts for cuts, edge wear, trapped metal, unusual sag and obvious tracking change. Pay attention to skirting and return areas where thin aluminum can work underneath.
- Make sure screens, chutes, transfer points and collection bins are open and have enough space for the run.
- Remove retained material from the magnet, screen and ECS areas left from the previous shift.
- Compare the load with the approved feed specification. Sealed vessels, batteries, liquids, flammable items, large hard-steel pieces and unidentified residue should be stopped before they reach the machine.
- Check that bale, briquette and product collection areas are correctly positioned and not already close to full.
During production
During production, numbers help, but context matters. A motor-current increase means little unless the feed and load are comparable. The same is true for temperature and vibration. What matters is the departure from a known baseline under similar conditions.
- Feed the line evenly. Loader impacts, sudden surges and bridging can make a healthy machine appear unstable.
- Log overload reversals, jams, emergency stops and manual interventions. One event may be incidental; a rising count is a trend.
- Watch the discharge, not only the inlet. A restricted screen or chute can raise load several machines upstream.
- Look at both sides of the magnetic split. Aluminum in the ferrous reject may point to burden depth, poor liberation or a shifted magnet.
- Check the ECS residue for aluminum that should have been recovered. Record feed size, moisture, belt tracking and splitter position before changing settings.
- Do not turn a hot bearing, repeated alarm or growing leak into “normal operation” simply because material is still moving.
The product streams are often the earliest warning. Extra steel in the aluminum, recoverable aluminum in the ECS residue or a sudden rise in fines may appear before a bearing, screen or separator produces a clear alarm. The guide to magnetic versus eddy current separation explains why those symptoms should not be corrected with the same adjustment.
Shutdown and Cleaning Checklist
Cleaning earns its place in a maintenance plan only when it reveals something. A bright floor and a polished guard do not help if packed fines remain under skirting, around a seal, on a rotor shell or across a cooling passage.
- Use the approved shutdown sequence. Let upstream material clear only where the procedure permits.
- Before contact, complete the required isolation and zero-energy verification.
- Remove aluminum pieces, wire, rubber, film and fines from areas where they can wrap, rub, trap heat or interfere with sensors.
- Clean motor cooling fins, fan inlets, electrical cabinet filters and hydraulic cooler surfaces without forcing conductive dust into sensitive components.
- Inspect the cleaned surface for polished rub marks, cracks, looseness, missing fasteners, displaced seals and fresh metal dust.
- Clean chutes and splitter surfaces so the next shift starts with the intended material trajectory.
- Keep scrap, tools and cleaning materials out of the machine before guards are restored.
Avoid using compressed air or high-pressure water as a universal answer. Either method can drive conductive dust, fines or moisture into bearings, motors, cabinets and rotor assemblies. The cleaning method should be chosen for the component and the site’s dust-control procedure.
Weekly or Operating-Hour Checklist
The weekly layer is where “looks fine” should give way to repeatable checks. Use the same measurement point, the same tool and a stated action limit. Otherwise two technicians can inspect the same bearing and leave two completely different records.
| Area | Check | Evidence to record |
|---|---|---|
| Fasteners and structure | Loose mounting bolts, cracked welds, fretting marks, shifted guards, loose chutes and anchor movement | Marked fastener position, torque action where specified, photo and repair status |
| Belts, chains and couplings | Alignment, tension, wear, glazing, fraying, chain elongation, damaged covers and lubricant contamination | Measured tension or deflection, alignment result and replacement threshold |
| Bearings and gearboxes | Temperature trend, noise, vibration, oil level, seal leakage and breather condition | Same measurement point, load condition and ambient context |
| Hydraulics | Hoses, fittings, cylinders, filters, oil level, abnormal heat and pressure stability | Leak class, pressure reading, filter indicator and oil appearance |
| Sensors and electrical | Cable damage, loose glands, dirty sensors, misaligned proximity switches, cabinet filters and alarm history | Alarm count, cleaned/adjusted item and functional test result |
| Material path | Skirting, liners, screen panels, chutes, splitter edges and product-bin transitions | Wear measurement, buildup location and material loss |
A hot bearing is a good example. Adding grease without checking the cause may make the temperature worse. Excess grease, the wrong product, contamination, misalignment, overload and internal damage can all produce heat. Use the lubricant, quantity and method specified for that bearing arrangement; some sealed units need no manual greasing at all.
Planned-Shutdown and Major Service Checklist
A planned stop should do more than replace whatever is visibly worn. It should answer three questions: what changed, why it changed, and whether the line can safely reach the next scheduled stop. Replacing a part without dealing with the cause can simply restart the same failure pattern.
- Measure cutters, spacers, hammers, pins, liners, grates and screens against the limits for the actual machine.
- Inspect shafts, bearing seats, seals and labyrinth areas for movement, fretting and contamination paths.
- Check belts, pulleys, sprockets and couplings. Realign the drive after any change that can disturb its position.
- Look beyond the machine casing: supports, foundations, anchor bolts, platforms, lifting points and maintenance doors also move and wear.
- Test safety circuits, interlocks, emergency stops and alarms under the approved procedure. Remove bypasses and undocumented modifications.
- Have qualified personnel inspect terminals, contactors, VFD cooling, cable insulation and cabinet sealing.
- Review hydraulic oil condition, filter status, hose condition, accumulator procedure and cylinder alignment where fitted.
- Validate speed, temperature, pressure, level and belt-drift sensors used to protect the line or control product quality.
- After reassembly, use a documented no-load check followed by a controlled-load restart. Do not make the first full feed the acceptance test.
High-speed impact equipment needs a separate level of detail. The hammer mill maintenance guide covers matched hammer groups, rotor balance, pins, screens, liners, bearings and post-impact checks without applying those requirements to a low-speed shredder.
Machine-by-Machine Aluminum Recycling Line Checklist
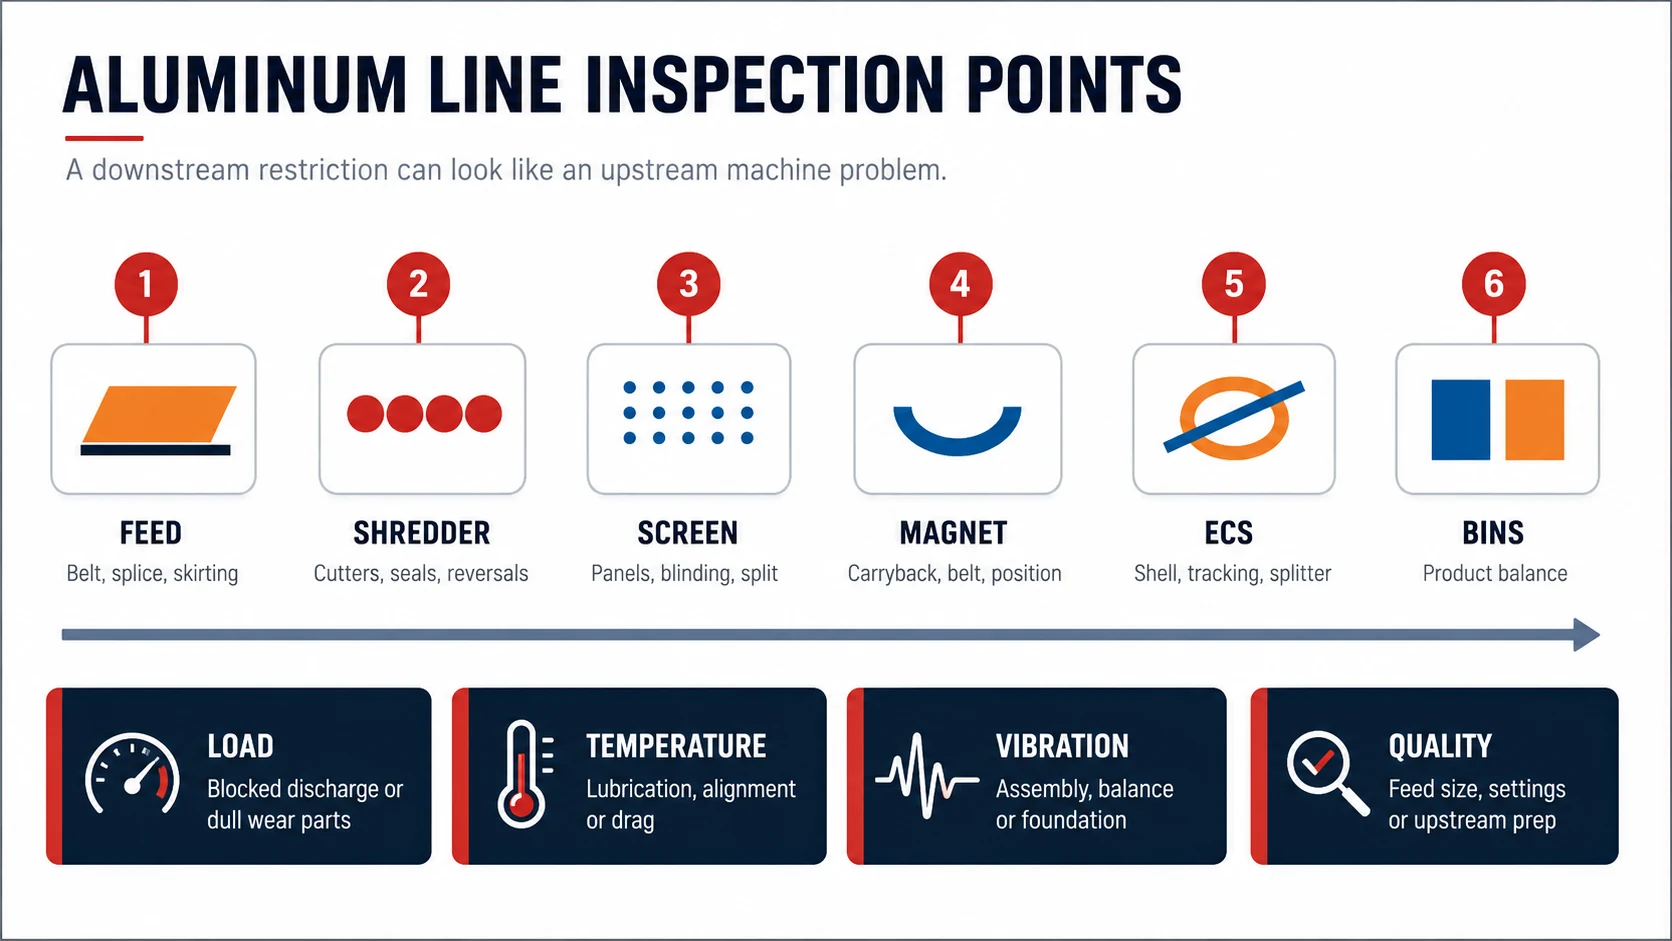
Follow the material, especially when the first symptom appears upstream of the real restriction. A plugged screen can raise shredder load. Poor sizing can look like an ECS fault. A leaking chute can remove saleable aluminum without triggering an alarm.
Feed conveyor and transfer points
- Walk both carrying and return sides. Check the belt surface, splice, edge, take-up, cleaners, skirting and rollers.
- Remove trapped metal before it reaches a pulley or cuts into the belt.
- Look for holes and worn liners at chutes and transitions; small losses here can add up without showing in the control room.
- Test speed switches, belt-drift devices, pull cords and guards under the site procedure.
- Compare burden depth with the condition used when the separator settings were established.
Low-speed primary shredder
- Trend reversals, current, shaft speed and jam frequency by feed type instead of mixing all production into one average.
- After isolation, inspect cutter edges, cracks, looseness, spacer condition and wrapped material.
- Check the bearing and seal areas for contamination paths as well as leakage.
- Inspect chamber fasteners, housing joints, torque-reaction points and the discharge opening.
- After a hard object enters the chamber, inspect the whole load path before restarting. Rotation alone does not prove that no damage occurred.
Access for service is worth checking before the line is ordered. The aluminum scrap shredder selection guide includes questions about maintenance doors, lifting space and wear-part handling that are difficult to solve after installation.
Hammer mill or secondary crusher, when installed
- Treat hammers, pins and related hardware as a rotor set. Uneven replacement can create a balance problem.
- Inspect screens or grates, liners and packed material that changes residence time.
- When vibration changes, include the feed, discharge, bearings, drive and foundation in the check. The rotor is not the only possible source.
- A heavy impact calls for an inspection even when the machine still turns freely.
Screen
- Inspect panels, perforations, fasteners, seals and the oversize-return path.
- Clear blinded areas, then ask why they formed: moisture, particle shape, feed surge and an unsuitable opening require different fixes.
- Occasionally weigh the size fractions. A worn panel can quietly alter the ECS feed long before the screen looks badly damaged.
Magnetic separator
- Remove buildup from the face, belt or drum where it weakens the working gap or causes rubbing.
- Check tracking, cleats, carryback and the discharge trajectory.
- Inspect both the ferrous fraction for aluminum loss and the aluminum product for accessible steel.
- Confirm that the magnet position and burden depth have not drifted from the tested setup.
Eddy current separator
Eddy current separators deserve particular care because feed preparation and rotor-area damage affect both recovery and reliability. One Eriez manual calls for daily inspection of retained metal, the belt and rotor-shell area, motors, chutes, guides and tracking.[4] An Industrial Magnetics manual warns that ferrous material can damage the rotor, shell and belt, and specifies coordinated start/stop sequencing so material is not left over a spinning rotor.[5]
- After approved isolation, inspect the belt, shell, side guides, brushes, splitter and chutes for retained metal and wear.
- Treat recurring steel at the ECS as an upstream problem until the evidence shows otherwise.
- Observe belt tracking after the machine reaches operating temperature; cold tracking alone may hide side rubbing.
- Record belt speed, rotor setting, splitter position, feed size and moisture before judging a change in recovery.
- Do not improvise repairs on a high-speed rotor or shell assembly.
Metal baler
- Inspect chamber liners, ram face, guides, doors, locks, tie system and the bale-ejection path.
- Check hoses, fittings, seals, cylinder rods, oil level, filters and hydraulic temperature.
- Trend cycle time, bale density and incomplete cycles. Raising pressure will not correct every valve, feed or wear problem.
- Keep residual liquid and loose hard objects out of the chamber; both can make ejection less predictable.
Chip feeder and briquetting press
- Control free cutting fluid before it spreads through the machine, floor and finished briquettes.
- Inspect bridging points, screw or ram wear, the compaction chamber, seals and discharge.
- Track hydraulic pressure, cycle time, briquette density and collected liquid together.
- Long turnings and foreign metal should be corrected at the feed, not forced through with a more aggressive setting.
Dust, air and fluid systems
- Inspect hoods, ducts, filters, rotary valves, fans, differential-pressure indicators and the collected material.
- Where wet scrap or chips are processed, check drainage, liquid collection and spill control.
- Use the site’s fire, dust and environmental procedures; this article does not replace them.
Common Symptoms and What to Check First
| Observed change | Possible causes | First evidence to collect |
|---|---|---|
| Motor load rises on the same feed | Dull cutters, blocked discharge, screen blinding, bearing drag, belt tension, hidden hard objects or denser feed | Feed sample, downstream flow, current trend, reversal count, temperature and shutdown inspection |
| New vibration after wear-part work | Incorrect assembly, uneven mass, misalignment, loose fastener, coupling error or foundation movement | Work history, no-load vibration, component positions, fastener marks and alignment measurement |
| Bearing temperature increases | Over- or under-lubrication, wrong lubricant, contamination, misalignment, overload or damage | Quantity and type of lubricant, load, ambient temperature, vibration and paired-bearing comparison |
| Conveyor belt moves to one side | Buildup, uneven loading, misaligned pulley or idler, incorrect take-up, damaged belt or structure shift | Tracking empty and loaded, pulley cleanliness, take-up measurements and edge-wear pattern |
| More aluminum in ECS residue | Feed layer too deep, size distribution changed, wet or sticky feed, belt/splitter setting, rotor issue or poor upstream liberation | Mass balance, size sample, moisture, settings, belt condition and upstream product |
| Steel appears in aluminum product | Magnet position, deep burden, carryback, damaged separator belt, trapped inserts or incomplete liberation | Ferrous reject, product sample, burden depth, magnet condition and feed structure |
| Hydraulic cycle slows | Oil temperature, filter restriction, internal leakage, valve issue, low oil, pump wear or feed obstruction | Pressure, temperature, filter indicator, oil level, cycle stage and leak inspection |
Use the feed condition, operating trend and shutdown inspection together. Otherwise a plant can replace a bearing when the true restriction is a blocked chute, or retune the ECS when a worn screen has changed the particle-size distribution.
Spares, Records and Action Thresholds
A maintenance log is useful only when it connects a change to an action. “Machine checked—OK” cannot show that a bearing climbed 12°C over three weeks, or that reversals doubled after the scrap mix changed.
Record at least
- Operating hours, starts, cycles and feed description.
- Motor current or load, key temperatures, vibration readings and alarm history.
- Reversals, jams, impact events, emergency stops and time lost.
- Wear measurements with a consistent point and method.
- Lubricant type, quantity, date and person performing the task.
- Parts installed, serial or drawing number, position and reason for replacement.
- Product and reject checks: ferrous carryover, aluminum loss, non-metal contamination and fines.
- Photos before and after work, especially for recurring defects.
Define three thresholds
| Threshold | Meaning | Typical response |
|---|---|---|
| Monitor | A change exists but remains within the approved operating boundary | Increase observation frequency and compare with the same feed and load |
| Plan | The component is approaching a wear or condition limit | Schedule parts, labor, lifting tools and a shutdown window |
| Stop | Continuing could create unsafe operation, major damage or unacceptable product | Stop under the approved procedure, isolate and investigate before restart |
Critical spares should match the actual bill of materials: belts, sensors, filters, seals, wear plates, cutters or hammers, fasteners, hydraulic parts and documented electrical components. A part that “looks close enough” is a poor plan for a shutdown.
Service space is part of reliability. The aluminum recycling plant layout guide discusses lifting access, maintenance clearances, traffic separation and storage decisions that are much cheaper to settle before installation.
Printable Aluminum Recycling Line Maintenance Checklist
Shift / Date: ____________________ Line: ____________________
Pre-start
- Previous work closed; no active lockout or unfinished repair
- Guards, doors, interlocks and emergency stops ready for approved check
- No fresh oil, hydraulic fluid or grease leak
- Belts, chutes, screens and discharge paths clear
- Magnet and ECS free of retained material
- Feed matches approved specification; prohibited items removed
- Product bins, bale area or briquette collection ready
During operation
- Motor load within normal range for this feed
- No new vibration, knock, scrape or cyclic sound
- Temperatures stable at defined measurement points
- Reversal, jam and alarm count acceptable
- Feed layer and discharge flow stable
- Ferrous reject and aluminum product visually acceptable
- ECS residue checked for recoverable aluminum
After shutdown
- Approved isolation completed before contact
- Buildup removed from specified areas
- Wear, rubbing, cracks, looseness and leaks inspected
- Work orders and measurements entered
- Guards restored and controlled restart completed
Abnormal condition / action taken:________________________________________________________________________________________________________________________________________________________________
Download the Printable Maintenance Checklist
Save the fillable A4 PDF for shift inspections, shutdown checks and maintenance records.
↓ Download PDF ChecklistPlan the Service Work Before the Line Is Built
Send YUXI the feed description, target throughput, proposed process route, workshop dimensions and local electrical standard. The engineering review can then account for service clearances, lifting access, wear parts and the maintenance documents needed for the selected equipment.
FAQ
What should be checked every day?
Start with guards, emergency stops, leaks, loose parts, belt condition, clear chutes and prohibited feed. During the run, watch load, temperature, sound, vibration, jams and the quality of each product stream. For an ECS, the model manual may also call for daily cleaning and inspection around the belt and rotor shell.
Why does maintenance include product-quality checks?
Because the split can drift before a component fails outright. More steel in the aluminum product, more aluminum in the residue or a sudden change in fines can expose a problem with feed presentation, screening, magnetic separation, cutters or the ECS while the line is still operating.
Can the same checklist be used for shredder production lines,baler production lines and chip briquette production lines?
They can share the same safety, housekeeping, recordkeeping and condition-trending framework. They should not share one set of wear parts or service intervals. Each route needs the sections supplied for its actual machines.
What causes repeated jams in an aluminum scrap line?
The cause may be outside-spec feed, bridging, long wrapping material, a restricted discharge, worn cutters, an overloaded downstream machine or a sensor problem. Record where the jam starts. Not every stoppage originates in the shredder.
What should happen after an unshreddable object enters the line?
Stop and isolate the affected equipment under the approved procedure. After zero-energy verification, remove the object and inspect the load path—cutters or hammers, shafts, screens, liners, bearings, drive, guards, supports and downstream equipment—before a controlled restart.
What maintenance records matter most?
Keep operating hours, feed description, load, temperature, vibration, reversals, jams, wear measurements, lubrication, parts replaced and output-quality checks. Trend lines and before-and-after records are more useful than pages of repeated “OK” boxes.
Sources and Technical Notes
- OSHA, 29 CFR 1910.147 — The Control of Hazardous Energy (Lockout/Tagout).
- OSHA, 29 CFR 1910.212 — General Requirements for All Machines. Covers guarding for point-of-operation hazards, nip points, rotating parts, flying chips and sparks.
- OSHA, Guidance for the Identification and Control of Safety and Health Hazards in Metal Scrap Recycling.
- Eriez, Eddy Current Separator Installation, Operation and Maintenance Instructions. Model-specific example of daily rotor-shell, belt, motor, chute, guide and tracking checks. It is not a substitute for the manual supplied with another machine.
- Industrial Magnetics, Eddy Current Separator Service Manual. Provides model-specific guidance on start/stop sequencing, upstream ferrous control, belt tracking and shell inspection.
- U.S. EPA, AP-42 Chapter 12.8 — Secondary Aluminum Operations. Describes secondary-aluminum pretreatment as a combination of sorting and mechanical preparation stages selected around the scrap condition.